Sourdough bread recipe
Creating a sourdough starter is easy. Everyone can do that, by following some simple instructions. Making a good bread with a sourdough becomes more complicated. Especially if you are looking to have one of these amazing loaves you see so often on social media posts. Most of us have started with a recipe and a method that has been fine-tuned over time. With many bad results, but little by little you start to learn your starters' behaviour. The right quantity of water that you need to add to your dough. The best temperatures to proof etc... By the end you will get there!
Every place is different, every flour has its own properties, every hand has its own touch, it's important to take note of what you are doing if you are still learning. As such you can change small things. I would also recommend to go easy with the water in the beginning. Not all the flours are able to absorb the same amount of water. Therefore the water quantity in the recipe is an indication.
I hope you get good results. You can always leave a feedback in the comment section below the recipe.
First things first. You need a starter...
Here the description to make the actual sourdough starter:
The water you use should ideally be chlorine-free. For this, you can use tap water and let it stand for 12 hours. Or you can run it through a Brita-type filter. It is also good to use water that’s at room temperature.
There are different flour options. White flour, wholegrain, rye, stoneground, spelt… etc. It doesn’t matter all that much. People must just be mindful that it isn’t a ready-made mix for some type of bread. Just the pure flour.
Rye or wholegrain flour will normally absorb a bit more water. I always try to achieve the consistency of an apple sauce. Not too liquid, but not too thick either. It mixes more easily.
Here the link to my registered sourdough on this website.
Day 1:
Mix 50 g of water with 60g of flour in a jar. Clean the rim and cover lightly. The jar doesn’t need to be fully sealed … just make sure no bugs or other such things can get in. Leave it out to rest for 24 hours, between 20 and 35°C.
Day 2:
Add another 50g of water and 60g of flour and leave to rest like on day 1.
Day 3:
Add yet another 50g of water and 60 g of flour and leave to rest like on day 2. You will now already begin to notice that something has sprung to life. An odd bubble here and there, as well as the start of a particular smell. This is when many think they’ve failed. Far from it. The yeast and lactic acid bacteria are competing for the same food and are trying to find a balance. Right now, the yeast is winning, but not for much longer.
Day 4:
Remove half the sourdough from the jar and set it aside. You can add an egg, some sugar and a little bit of baking powder to it and make pancakes with it. Add another 50g of water and 60 g of flour to the rest of your remaining mixture.
You now need to repeat this process until the sourdough begins to smell lightly sour, like yoghurt. This can take up to 7 days.
If you want to check whether your sourdough is ready, you can put a rubber band around the jar at the precise level of the dough, just after feeding it. Within six hours, the sourdough should have doubled in size. At least if it’s not too liquid, as otherwise the gas bubbles just escape and you won’t see anything.
You are now ready to bake. You should preferably feed the sourdough one last time 6 hours before you start baking.
This is the timeline:
At midday: feed the sourdough
At 6 pm: make the dough
This is the recipe:
250g of wheat flour
250g of wholegrain flour
350g of water
Mix it by hand or with a kitchen robot until the water is well mixed in. Leave it for half an hour. This is autolysis; this is a process in which the proteins in the flour absorb the water and the enzymes start to work.
Half an hour later, add:
10g of salt
50g of sourdough
50g of water
Knead the dough into a nice, smooth and flexible whole. This can take up to 20 minutes by hand. Using a kitchen robot, it’ll take about 10 minutes. The dough should be flexible. If you take a piece of dough between your thumb and index finger and pull it apart, it should form a nice little membrane.
Leave the dough in a lightly oiled bowl and cover it with a wet towel or shower cap.
Set a timer for one hour.
After an hour, remove the dough from the bowl and fold the mix from the outside in. This is to tighten up the gluten network so that the gasses that have begun forming don’t escape.
Repeat this twice more with an hour in between each time.
Store the (covered) dough in a cool place before going to bed. This can be in a wine cooler, cellar or terrace. Ideally, we are looking for a temperature of about 10-15°C/ 50-59°F.
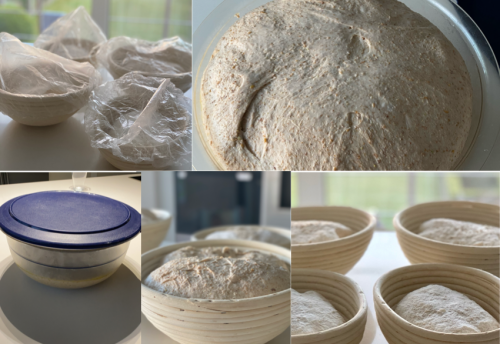
Don’t forget to use a bowl in which the dough can double in size.
The next morning, remove the dough from the bowl and tip it out onto a lightly floured table. Flatten it out a bit. We do this to evenly distribute the gas bubbles. As before, fold the outer edges inwards. What needs to happen is that you must feel that the dough is getting stronger. It should be shaped into a nice ball.
Use a mould that the dough will fill to about 2/3rds. Not too big, not too small. Line it with a cloth and avoid that there are too many folds in which the dough can go. Coat the cloth generously with flour. Roll your ball of dough in flour before putting it in the mould. Place the smooth side of the dough facing downwards.
Cover it up again with a wet cloth or shower cap and leave it out to rest. It is now a game of patience. The dough should rise to the rim or just beyond. This can take up to 6-8 hours.
Time to bake...
For baking, it is recommended to properly preheat the oven: at least 20 minutes, but preferably 30 to 45 minutes, at 250°C/480°F.
If you have a cast-iron pot that is big enough, you can already place this in the oven. This pot has the advantage of holding in the steam, which will help form a tasty crust when you bake your bread in it. If you don’t have a pot like that, use a regular baking tray that you’ve preheated.
When the dough has risen enough, take the baking tray or pot out of the oven. Carefully remove the dough from the mould by simply turning it upside down over the baking tray or pot. To ensure the dough doesn’t stick to the pot or tray, you can put some baking paper underneath it. Remove the cloth and wipe the excess flour off.
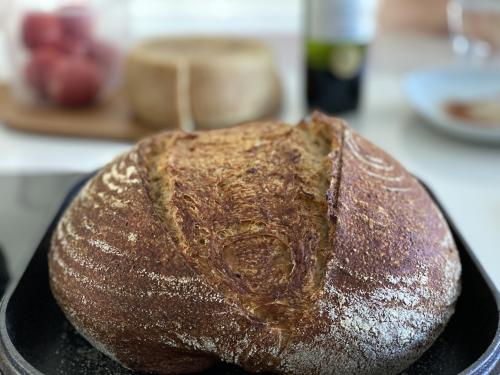
Now, take a very sharp knife. Bakers use a razor blade for this. In a short and powerful motion, cut across the middle of the bread. This cut is done so that the bread can rise nicely while in the oven. If the cut is done improperly, an ear will form on the side of the bread.
When using a pot:
Put the pot (and your dough) with the lid on in the oven and bake at 250°C/480°F for 15 minutes. Reduce the temperature to 220°C/430°F, and then remove the lid 5 minutes afterwards (and 20 minutes from the beginning of the bake). Be careful, the steam that escapes can be very hot. Bake for an additional 25 min. without the lid.
Without a pot:
Put the tray with the bread in the oven and pour a glass of cold water in an empty baking mould or oven dish and place it in the preheated oven. The idea is that this will generate steam. The steam will condense and form a lovely crust. Reduce the oven temperature to 220°C/430°F after 15 mins and bake for a total of 45 mins.
To see if your bread has been baked correctly, you can tap the underside with your fingers. If it sounds hollow, you’re done baking. If it sounds muffled, keep on baking!
There you are … with that you can get to work. Be mindful to watch the dough, not necessarily the time, as every sourdough is unique, and temperatures differ from kitchen to kitchen. Furthermore, by taking careful notes in a journal, you can avoid mistakes with each new bake. In doing this, you can add different quantities of water; let it rise in warmer or cooler temperatures, knead more or less, etc…
The more you bake, the better you’ll get at it. Don’t be discouraged. Post a picture of your baking results on Instagram or Facebook and tag me, @the_sourdough_librarian. I’ll make sure to congratulate you or give you some pointers.
Keep on baking!